How to use RxSwift with MVVM pattern
This time I want to talk about how to use RxSwift with MVVM. RxSwift has been a hot topic in the community for a few years now, but somehow I’ve managed to avoid it. It took me a while to switch my brain to the state that everything is observable. I also had some trouble at first to figure, when to use BehaviorRelay, Observable, PublishSubject and how should I bind values to UI components. I’ll cover all these topics in this blog. I’ll show how to use RxSwift with MVVM, UITableView with RxSwift, writing network layer and testing a RxSwift app. I won’t go through the MVVM pattern from the ground up, but after you’ve read the series you’ll be able to use RxSwift with MVVM. In case you want to know the basics of MVVM pattern, I suggest that you check out my older post MVVM with Swift application.
I’ll cover the topics by showing how to write an application called Friends. You can get the complete source code for the app on GitHub, just remember to check out the RxSwift branch. I wrote the app using MVVM without RxSwift 1,5 years ago. Now, I thought it would be nice to refactor it and see how it looks like when using RxSwift with MVVM. Friends is an iPhone app that downloads a list of friends and displays them in the app. You can also add, remove and update a friend. So it is a simple app with just enough complexity to cover many of the basic needs of an iOS app. So it is also a great place to start learning how to use RxSwift with MVVM! Btw, the backend is written in swift using Vapor!
In this first part of the app, I’ll show the basics of using RxSwift with MVVM. Setting up correct cocoa pods. Binding data between the view model and the view. Using UITableView, showing loading indicator and how to display an error to the user. We’ll first go through the view model side of the implementation and then the view.
Getting started using RxSwift with MVVM
At first, we need to add RxSwift to the project. In this example, we’ll use Cocoapods but you can also get with Carthage and Swift Package Manager. Check the GitHub repo for more info.
In the pod file you’ll need to add:
|
1 2 3 |
pod 'RxSwift' pod 'RxDataSources' pod 'RxSwiftExt' |
RxSwift adds the basic library including Observable, BehaviorRelay, PublishSubject etc. RxDataSources includes UITableView & UICollectionView related reactive libraries. RxSwiftExt helps with binding the observables straight to the UI-Components.
We’ll also add all the libs for the testing targets that we have. And after we are done editing the Podfile, we’ll need to run pod install in the terminal.
Listing friends using RxSwift with MVVM
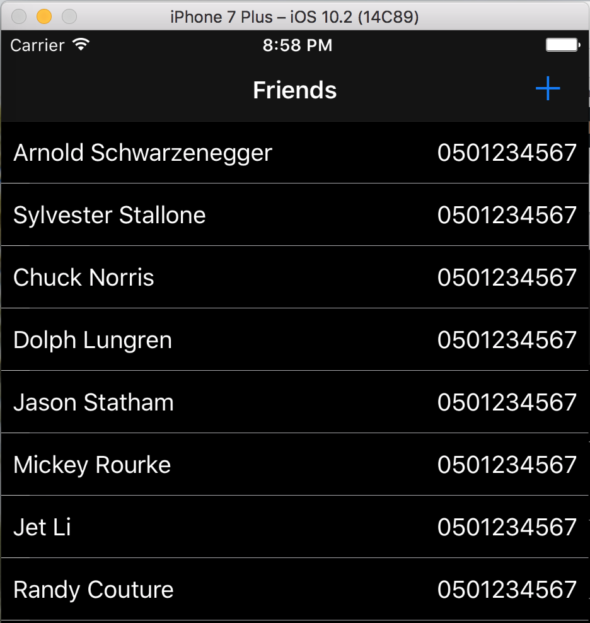
In the first part of how to use RxSwift with MVVM, we’ll be concentrating on the first view of the app:
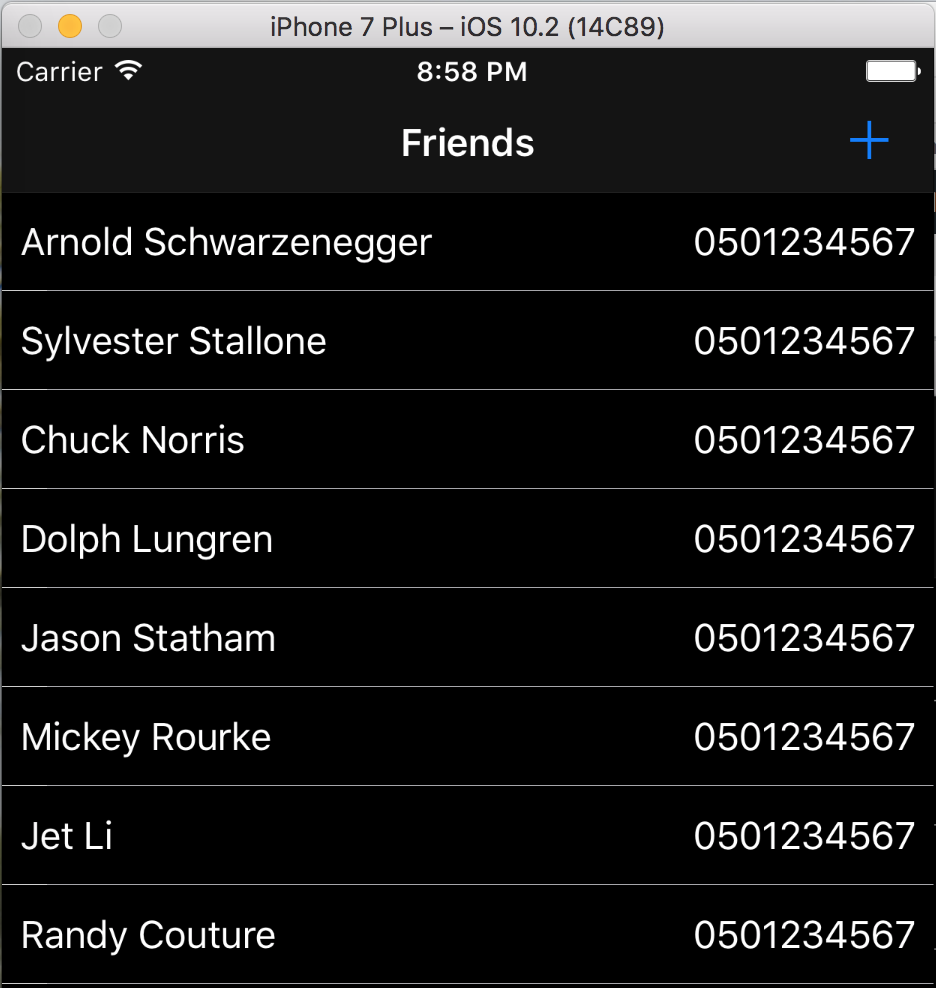
RxSwift with MVVM – friends table view
The first view has a table view that shows all items loaded from the backend. To present all this we’ll dive in to FriendTableViewViewModel & FriendTableViewController. Let’s start with the viewModel.
How to use RxSwift with MVVM – ViewModel
ViewModel is the module that makes the data ready for the view(which in this case is the FriendTableViewController). ViewModel is also the place we put most of the business logic. I say most since we should try to avoid the situation that view model turns into just another place that we dump all our code. You might have heard the MassiveViewController problem, we don’t want to end up with MassiveViewModel either. So if something can be refactored to its own module, we should always try to do that. But I am sure that you are eager to take a look at the code, so let’s check it out!
|
1 2 3 4 5 6 7 8 9 10 11 12 13 14 15 16 17 18 19 20 21 22 23 24 25 |
import RxSwift import RxCocoa enum FriendTableViewCellType { case normal(cellViewModel: FriendCellViewModel) case error(message: String) case empty } class FriendsTableViewViewModel { var friendCells: Observable<[FriendTableViewCellType]> { return cells.asObservable() } var onShowLoadingHud: Observable<Bool> { return loadInProgress .asObservable() .distinctUntilChanged() } let onShowError = PublishSubject<SingleButtonAlert>() let appServerClient: AppServerClient let disposeBag = DisposeBag() private let loadInProgress = BehaviorRelay(value: false) private let cells = BehaviorRelay<[FriendTableViewCellType]>(value: []) |
At first, well import RxSwift so that we have the tools provided by the library available. Right under the import statement, there is an enum FriendTableViewCellType. This enum contains all the cell types our table view can show. The types are normal cell, error and empty cell. Normal cell presents the data for a friend. Error cell show error information to the user and empty cell is shown when there is no data on the server. We’ll check how to use them more specifically in the view controller codes, but for now, this is all we need to know.
BehaviorRelays & Observables
Then we can start with the RxSwift stuff! At the bottom of the code block you can see two variables that are defined as BehaviorRelay. BehaviorRelay is a type provided by RxSwift. More specifically it is provided by RxCocoa so remember to import it in every file you need it. It’s a good place to start observing the RxSwift observables. Observables in RxSwift change their state by emitting onNext, onError, onCompleted event. However, with BehaviorRelay you use the accept function to set a new value. When we want to subscribe to a BehaviorRelay, we need to use the asObservable() function. After that all is setup and whenever the value is changed the observer is notified. Furthermore, BehaviorRelay can’t terminate with an error or completed event.
Here we have defined loadInProgress, cells as BehaviorRelays. Cells contains the cellViewModels, which are used when constructing the cells. The value for the array is set every time a valid response, containing friend data, is received from the server. Also the value only is only changed when a new request to server is completed. The cells is a private member so that the cell value can only be changed by the view model. This way there is no change that the value is accidentally changed in the view controller side. As a pair for the private cells variable we have a friendCells Observable. It is a computed property and it returns an Observable for the cells variable. This is the variable that we’ll later use in the view controller side to bind the cell value for the tableview.
The loadInProgress variable is used when ever this class is performing a network request. It is also defined as private, just as the cells variable we discussed above. loadInProgress also has a public computed property onShowLoadingHud. It is defined as an Observable and it returns the loadInProgress as an observable. This is the variable that we’ll bind to present the loading hud (binding happens in the view controller side). Notice the distinctUntilChanged. This makes sure the value is only emitted when it is different from the previously stored value.
PublishSubject
Now, let’s check the onShowError which is defined as a PublishSubject. PublishSubject receives information and then publish it to the subscriber. Here the subject that is received is defined as SingleButtonAlert and that is also what it will publish to the receiver. The value is emitted the same way as with all observables, using the onNext() function. So using PublishSubject is very similar to using BehaviorRelay, but instead of using the accept() function, well call onNext() instead. I think we could have also used simple BehaviorRelay with onShowError, but I wanted to use PublishSubject to cover a bit more types from RxSwift.
SingleButtonAlert is type that defines a title, message and a button title with an action to present an alert type for the user. The code is pretty self explanatory and you can check the class in here.
The last two members here are appServerClient and disposeBag. AppServerClient is a component which does all the requests to the server. All the codes are available, but I’ll dive into the network layer in another post.
So what is a DisposeBag
The last variable, but one of the most important one, is the DisposeBag. To destroy an Observable, we should always call dispose() to it. It would be very hard work to handle the disposing manually, so RxSwift equips us with the DisposeBag. When creating an Observable you should always add it to disposeBag by calling .disposed(by:) to it. This way when the disposeBag is deallocated, it calls dispose() to all the observables, which takes care of the memory they’ve used. So inside the view model, we define our own disposeBag. When the view model gets deallocated, all the observables are deallocated as well.
With these simple variables, we can already see that the data binding between the view model and view is very simple! In view controller side, we’ll only need to subscribe to these observables and data binding is completed. There is no need to use any other data binding technique (such as Bindable we were using in the How to use MVVM tutorial), or delegation since RxSwift does it all for us! How cool is this! 🙂
Getting friends from the server
As mentioned, we’ll be using AppServerClient for the server requests. Every time a request is sent to AppServerClient, it returns an Observable. Let’s see how this looks when we are getting a list of friends from the AppServerClient:
|
1 2 3 4 5 6 7 8 9 10 11 12 13 14 15 16 17 18 19 20 21 22 23 24 25 26 27 |
func getFriends() { loadInProgress.accept(true) appServerClient .getFriends() .subscribe( onNext: { [weak self] friends in self?.loadInProgress.accept(false) guard friends.count > 0 else { self?.cells.accept([.empty]) return } self?.cells.accept(friends.compactMap { .normal(cellViewModel: FriendCellViewModel(friend: $0 )) }) }, onError: { [weak self] error in self?.loadInProgress.accept(false) self?.cells.accept([ .error( message: (error as? AppServerClient.GetFriendsFailureReason)?.getErrorMessage() ?? "Loading failed, check network connection" ) ] ) } ) .disposed(by: disposeBag) } |
So we have defined a function getFriends(). The first thing to do is to present the loading indicator to the user whenever we are calling this function. This is done setting loadInProgress variable to true using the accept() function. After that we’ll call getFriends() from the appServerClient and subscribe to the observable it returns. Now, we’ll start to listen for the different values it can emit.
When an Observable receives a new value, it send an event containing the value. We could subscribe to the event, then go through all the states that the event can have and unwrap the value inside the event. But there is also an easier way. RxSwift also provides subscribe functions we can use for the different states. So instead of always checking which event was emitted. We can directly define the blocks for different states, as we’ve done above. The events can be onNext, onError, onCompleted and onDisposed.
Here we don’t need to free any memory when the onCompleted or onDisposed is called, so we only handle the onNext and onError states. Inside the onNext we’ll first set the loadInProgress to false. Then we’ll check the friends array we received, that it contains items. Incase it is empty, we’ll set [.empty] cell as the value for the friendCells. If we have a value, we’ll use compactMap to convert the friend items to cell view models and set the value for the cells.
Inside the onError we again hide the loadingHud. Then we’ll set the friendCells.value to [.error] and for the message we’ll use an extension to convert the provided error value to correct error message:
|
1 2 3 4 5 6 7 8 9 10 11 |
// MARK: - AppServerClient.GetFriendsFailureReason fileprivate extension AppServerClient.GetFriendsFailureReason { func getErrorMessage() -> String? { switch self { case .unAuthorized: return "Please login to load your friends." case .notFound: return "Could not complete request, please try again." } } } |
The last thing we’ll need to do is to add this observable to the disposeBag, so that it gets disposed when view model is deallocated.
Now we have covered the view model. let’s move on the view controller side.
How to use RxSwift with MVVM – ViewController
In the view controller we’ll use the RxDataSources for the table view handling and RxSwiftExt for binding the observables directly to the UI-Components. In this part, we’ll also concentrate on presenting the loading hud and an error to the user. We’ll also bind the friendCells values to tableview and see how we can delete a friend.
At the beginning of the class, we’ll notice the view model definition. This is where we’ll also create the view model since this is the first view of the application.
|
1 |
let viewModel: FriendsTableViewViewModel = FriendsTableViewViewModel() |
In the viewDidLoad we’ll call the preparing functions:
|
1 2 3 4 5 |
bindViewModel() setupCellDeleting() setupCellTapHandling() viewModel.getFriends() |
First, we’ll prepare the view model by binding all the values in the bindViewModel(). Then we’ll setup cell deleting and tapping. After those function calls the view is completely setup, and we can use the getFriends() function to start downloading the data.
Binding tableView datasource and handling delegation using RxSwift with MVVM
Next, let’s check the bindViewModel() function:
|
1 2 3 4 5 6 7 8 9 10 11 12 13 14 15 16 17 18 19 20 21 22 |
func bindViewModel() { viewModel.friendCells.bind(to: self.tableView.rx.items) { tableView, index, element in let indexPath = IndexPath(item: index, section: 0) switch element { case .normal(let viewModel): guard let cell = tableView.dequeueReusableCell(withIdentifier: "friendCell", for: indexPath) as? FriendTableViewCell else { return UITableViewCell() } cell.viewModel = viewModel return cell case .error(let message): let cell = UITableViewCell() cell.isUserInteractionEnabled = false cell.textLabel?.text = message return cell case .empty: let cell = UITableViewCell() cell.isUserInteractionEnabled = false cell.textLabel?.text = "No data available" return cell } }.disposed(by: disposeBag) |
At first, we’ll bind the friendCells to tableview. As you might remember friendCells is a computed property of cells and it returns the Observable from the cells variable. After that we’ll call bind(to:) and give the tableView.rx.items as parameter. tableView.rx.items is a binder function working on observable sequence of elements, such as Observable<[Friend]>. Binding creates an ObserverType which subscribes it self to the observable friend array. It also sets it self as the dataSource and delegate for the tableView. When ever a new value is received from thefriendCells table view reloads it’s content.
RxSwift calls the closure that we have defined for each item. Here is where we can configure the cells. The element contains the enum value defined in the view model side and index is the index of the element. Since our view only has a single section, we’ll convert the index as indexPath, using section value zero. Then, we’ll use switch to check if the element contains .normal, .error or .empty cells.
In the normal case, we’ll deque the cell from the tableView and set the viewModel received as the cells viewModel.
In error case, we’ll create a default UITableViewCell and set the provided error message as the textLabel?.text. In empty cell’s case, we’ll do the same as with error case, with the exception that we’ll use hard coded “No data available” as the textLabel?.text.
Now that we have handled the data source and delegation of the tableView, all that is left is to make sure that this observable is disposed using the disposeBag when the view is deallocated.
So what do you think? When you compare this piece of code, to the normal way of setting up the data source and implementing all the tableView delegate functions, which one do you feel is easier?
Now, let’s see how to handle the selection of a cell by checking the cell deleting!
Handling cell deleting
Cell deleting is also handled by a function provided by the rx extension:
|
1 2 3 4 5 6 7 8 9 10 11 12 13 14 15 16 17 |
private func setupCellDeleting() { tableView .rx .modelDeleted(FriendTableViewCellType.self) .subscribe( onNext: { [weak self] friendCellType in if case let .normal(viewModel) = friendCellType { self?.viewModel.delete(friend: viewModel) } if let selectedRowIndexPath = self?.tableView.indexPathForSelectedRow { self?.tableView?.deselectRow(at: selectedRowIndexPath, animated: true) } } ) .disposed(by: disposeBag) } |
Again, we can access the helper functions for tableView using the .rx. Whenever the delete event gets called for the table view, also the modelDeleted gets called. So, inside the function, we’ll just check that the cell type is what expect, and call the viewModel.delete function with the correct view model as a parameter. Since the friend application updates the cells by reloading the content from the server, we’ll also deselect the row here to make the UI to work smoothly.
Selecting a cell is done with modelSelected and the handling is very close to cell deleting. I hope you can figure it out by your self, just by looking at the code. If not, leave a comment or message me on twitter and I’ll explain help you with that.
Now, the only thing left for us in this part is to present an error and loading hud! Isn’t that exciting or what? 🙂
Presenting errors and loading hud
In the bindViewModel() we also start observing when to present the loading hud, and if needed the error note. We could do it by the same way we were listening to the observable states when receiving friends from the network client. But since now we don’t have that complex error handling we can do this simpler way like this:
|
1 2 3 4 5 6 7 8 9 10 11 |
viewModel .onShowError .map { [weak self] in self?.presentSingleButtonDialog(alert: $0)} .subscribe() .disposed(by: disposeBag) viewModel .onShowLoadingHud .map { [weak self] in self?.setLoadingHud(visible: $0) } .subscribe() .disposed(by: disposeBag) |
First, we’ll get the onShowError and map the received event. Whenever we receive the [rad-h]onNext[/rad-hl] event, we’ll access the emitted SingleButtonAlert value with the $0 and present the error dialog. Then, we’ll call the subscribe to start to listen to the events, and finally, we’ll set the disposeBag to dispose the observable. Next, we’ll do the same thing for the onShowLoadingHud.
And with that, the first part of this RxSwift with MVVM series is completed. On the next part, we’ll check how to validate input data from multiple UITextViews and how we can provide data back to the presenting view controller. We’ll also check how to bind data to back and forth UI-components between view model and the view.
If you have any questions, comments or feedback you can comment below or contact me on twitter! Also if you liked the post I hope you’ll share it with some of your friends, I’d really appreciate it! Thanks for reading and see you next time my friend!
Should use BehaviorSubject instead of Variable?
Hi Tranhieutt,
BehaviourSubject works like PublishSubject but it also repeats the latest value to new subscribers. It depends on what your goal is and what is the variable for. I haven’t thought a specific rule when to go with Variable, PublishSubject or BehaviourSubject. Just think about your use case and select the one that fits best! 🙂
It is a great and detailed post for new to understand. but, would you mind posting the whole code or updating the code in the Github? I have checked the code in Github and find it is not the same in this post. Thanks.
Hi Jun!
Thanks, I am glad you find the post helpful. There might be slight differences in the code that is in Github, but I think it is pretty much up to date. What is it that you find hard to understand? Maybe I can help you with that? Just making sure that you did checkout the RxSwift branch from GitHub?
Thanks for your article , it seems that Variable is depreciated
Thanks, I’ll update the article.
Hi Jun! THanks to you I was finally able to implement MVVM in my project! Thanks a lot!
I can’t figure out how to make cells listen to taps and swipes though. Really stuck here. Could you give a hint please?
Thanks! Altough I am not sure who is Jun? 🙂
I think the information you are looking are in the blog post. I have implemented the cell clicking and deleting a friend is done using the swipe. Check the post again and if you still have problems could be a bit more specific with what you are trying to do so it is easier for me to help you 🙂 Thanks!
Hey! And another question – how would you implement pagination in this framework?
This is pretty wide question 😀 I think you’ll learn a lot if you search the internet and implement this step by step on your own 🙂
Thanks you, It is a helpful post! but i don’t know why you make some pair of Variables.
for example, your code in FriendsTableViewViewModel:
var onShowLoadingHud: Observable {
return loadInProgress
.asObservable()
.distinctUntilChanged()
}
private let loadInProgress = BehaviorRelay(value: false)
but i think onShowLoadingHud is not need because i can change from BehaviorRelay to Observable in viewController.
FriendsTableViewController – bindViewModel () {
viewModel
.loadInProgress
.asObservable()
.distinctUntilChanged()
.map { [weak self] in self?.setLoadingHud(visible: $0) }
.subscribe()
.disposed(by: disposeBag)
}
is there some reason why you write pair of variable?
please let me know the reason.
thank you.
Hi Jin,
Thanks, makes my day to hear that I was able to help you 🙂
Yes, you can of course do this using only one variable.
I use ‘loadInProgress’ and ‘onShowLoadingHud’ because I think loading is a specific view model action that view controller does not need to know about. View model needs to keep track if we are loading something or not. View controllers job is only to present the hud to the user. The reason behind it doesn’t need know. It only gets the event and shows/hides the hud.
The naming could be better here, ‘onShowLoadingHud’ is specifically bind to loading events :). I might change it a bit if I wrote the code today. But this code is also refactored from a version of Friend app that did not have RxSwift and I want it to look familiar also for the people who read the plain MVVM application with Swift blog posts.
Thank you Jimmy for your effort and for your awesome, detailed, focused, super practical and to the point post 👍💪🥇
Keep it going and I will be waiting on fire for your next awesome article!
🚀🚀🚀
Thanks a lot for the kind words Ahmed! 🙂
Can you do a PromiseKit post also ?
Its pretty trendy now and its hard to find nice and easy person to explain it 😉
What do you think, can you 🤔💭
I do have quite a few things on my topic list so I can’t promise(Kit) you that I’ll do it any time soon..
I haven’t used it my self, and even if I work with Futures I still need to learn the library before writing about it. I added it to backlog so when I have spare time in my hands I’ll look into that.
But I think you’ll get your answers a lot quicker if you can find a tutorial online. Or is there any books written about it? I really like to read a book if there is an interesting topic that I want to learn.
Ya sure the books are the first step to learn any thing and from there you can go deeper and deeper.
actually I came by your tutorials out of book, Obj App Architecture chapter 4 (MVVM+C) and they were using RxSwift.
🙂
heheh, nice 🙂