How to unit test ViewModel in Swift
In this blog post, we are going to unit test the MVVM Friends mobile application. We did go through the application implementation in the previous three-part blog post series MVVM with Swift application, and now is the time to write unit tests for the application. There are few topics that will be covered today:
- Unit test Model.
- Mock Model object for different unit tests.
- Mock network layer.
- Unit test ViewModels.
If you want to follow the code you can find the complete source code for the application in GitHub.
Why should we write unit tests?
First, let’s talk a little bit about why unit tests should be written. Unit tests are there to work as a safety net. Let’s say you have written a big piece of code 6 months ago and now you need to make some changes to that code. Do you remember all the reasons behind the decisions that you made? Do you remember all the functionality, that the code you wrote is handling? Is it you who is going to do the changes? It is not easy to do a big change in the code without breaking anything, but that’s exactly where unit tests are your best friends. If you happen to break anything, you will see it straight from the failing unit test. You might also catch problems while writing a unit test, and you are able to fix the code before it causes any trouble. Unit tests also document the code a bit, so by studying them you are usually able to get the picture about how the code should work.
What should be tested?
100-percentage test coverage is not the best measurement in unit tests. If the project is under time pressure, the release date is closing in, or you are working for a client and charged by the hour, in my opinion, it’s not worth aiming to test every single line of the code. Instead, you should think about what is the core logic of each testable class, and try to cover all cases for that logic. Another important consideration is the corner cases. What are the conditions that might cause problems in your code? Can you write a unit test for each of those cases?
Unit test for Model
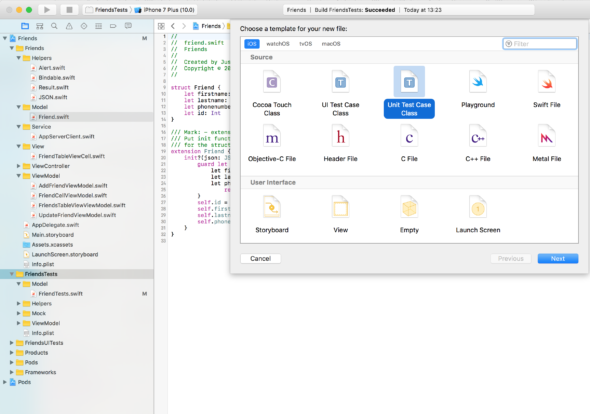
Let’s start by writing unit tests for the Friend model. If you are familiar with the Friend project you’ll remember that Friend model defines a friend object which has firstname, lastname, phonenumber and an id. There isn’t that much to test since Friend model only has JSON initializer. But let’s write tests for that. Open up Xcode, if it is not open already. Click the FriendsTest folder on the left side and add a file named FriendTests:

Select “Unit Test Case Class” and after given the name “FriendTests”, make sure that the target for the file is FriendsTests. Now open up the file, clean the auto-generated code, and add the following lines of code:
|
1 2 3 4 5 6 7 8 9 10 11 |
class FriendTests: XCTestCase { func testSuccessfulInit() { let testSuccessfulJSON: JSON = ["id": 1, "firstname": "Jimmy", "lastname": "Swifty", "phonenumber": "0501234567"] XCTAssertNotNil(Friend(json: testSuccessfulJSON)) } } |
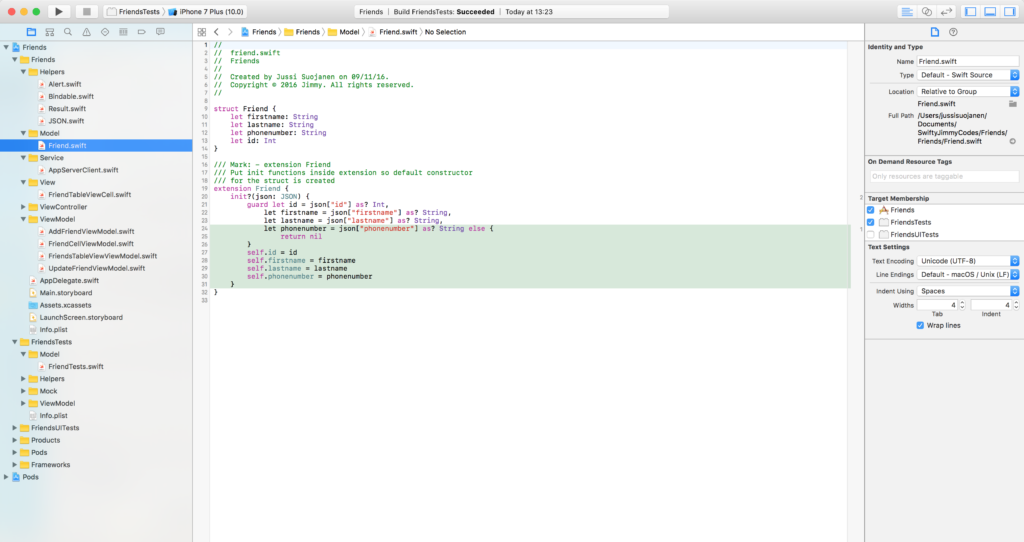
Now, there is only one test called testSuccessfulInit. It does exactly what the function name says. It tests that a friend object is created from the Friend model with correctly formatted JSON. First, testSuccessfulJSON is defined with the correct keywords and values, and then it is given as parameter to Friend initialiser inside XCTestCase class XCTAssertNotNil function. When the initializer returns, XCTAssertNotNil will fail if the object is not created. Now, when we compile the code, we see that the Friend is not recognized by the test target and thus we get an error. Let’s fix that by opening the friend file and check the target membership (from the right side of Xcode) also for FriendsTests:
Now when we compile again, the error is gone. The test can be run by pressing the tile either on the left side of the class definition, or the one left to the function definition. After clicking it Xcode compiles the code and the test is run. Now, since the test passed we can mark Friend model as tested in our todo-list and move on with our testing.
Mocking Model, Network layer and unit testing ViewModel
Now that we have warmed up, let’s jump right into testing ViewModels. Since FriendsTableViewViewModel is using the AppServerClient and AppServerClient has dependency to Friend model, we’ll cover it all in this chapter. But first, let’s stop for a moment to think about what we should really test from the FriendsTableViewViewModel?
As we already talked, 100-percentage test coverage is not the best measurement. So we need to think about the core logic of the ViewModel. FriendsTableViewViewModel has few jobs:
- Present friendlist on the screen.
- Present information if there is no friends available.
- Present error if there is a problem getting friend data from the server.
- Delete a friend from the server and update the view.
- Present error note, if the friend deletion fails.
If we can test all this functionality we have a pretty good safety net, if at some point we have to refactor the code. So let’s get started!
Mock Friend model for unit test
First, let’s create a helper extension for Friend, which we can use to create ‘dummy’ or ‘mock’ friend object for the tests. AppServerClient will return Friend object in it’s success result, so that’s where the MockFriend will come handy. Now, let’s create a new file for a testing target called MockFriend.
|
1 2 3 4 5 6 7 8 9 10 11 12 13 14 |
import Foundation extension Friend { static func with(id: Int = 0, firstname: String = "Jimmy", lastname: String = "Swift", phonenumber: String = "0501234567" ) -> Friend { return Friend(firstname: firstname, lastname: lastname, phonenumber: phonenumber, id: id) } } |
Let’s create an extension for Friend and put one static function inside. This static with() function will work as an initialiser for Friend with predefined default values. If we only need a dummy Friend object in our tests, we can use it like this: Friend.with(). If in some cases we need to define some different variables, we can use the same function and alter the input parameters as we see fit for our test. For example, if we need to check that two users doesn’t have the same id, we can create objects like Friend.with(id: 1) & Friend.with(id: 2).
Unit test FriendsTableViewViewModel and MockAppServerClient
Now that we have everything set up for the AppServerClient, we can start writing tests for FriendsTableViewViewModel. Let’s create a file called FriendsTableViewViewModelTests for the testing target. Since AppServerClient is needed in the tests, we will add a private MockAppServer class at the end of the file, under the FriendsTableViewViewModelTests class:
|
1 2 3 4 5 6 7 |
private final class MockAppServerClient: AppServerClient { var getFriendsResult: AppServerClient.GetFriendsResult? override func getFriends(completion: @escaping AppServerClient.GetFriendsCompletion) { completion(getFriendsResult!) } } |
So we have a private class called MockAppServerClient, which is derived from AppServerClient. We are using inheritance here, but we could also have a protocol AppServerClientProtocol which we’ll make our dummy to the client to conform to. This time I didn’t have the protocol available and I didn’t see the value in creating one and refactoring the original AppServerClient to conform to it. We have also defined a new variable in the mock class: getFriendResult, which we will be using later in our tests. Depending on the unit test we are writing, we can define the wanted result inside the test function. This way it is very easy to follow what the specific unit test is expecting to happen.
We’ll start by testing the cell creation from friend data, so at this point we only need to override AppServerClients getFriends function, and put getFriendResult as a parameter in the completion function. Even if most of the style guides usually guide you against using the !-mark, it is ok for the unit test to use it. It is highly unlikely that the force unwrap fail unless there is something wrong in your unit test.
Unit test friend cell creation
Let’s clear all the auto-generated code from FriendsTableViewViewModelTests class and add the first unit test:
|
1 2 3 4 5 6 7 8 9 10 11 12 13 14 15 16 |
class FriendsTableViewViewModelTests: XCTestCase { // MARK: - getFriend func testNormalFriendCells() { let appServerClient = MockAppServerClient() appServerClient.getFriendsResult = .success(payload: [Friend.with()]) let viewModel = FriendsTableViewViewModel(appServerClient: appServerClient) viewModel.getFriends() guard case .some(.normal(_)) = viewModel.friendCells.value.first else { XCTFail() return } } } |
TestNormalFriendCells() function tests that a normal cell creation is working. As you might remember, we have three different types of cells in the table view: normal, empty & error which are defined in the FriendTableViewCellType. In this unit test, we want to make sure that after a successful getFriends-call view model really has the normal cell type inside the friendCells.
First, we create an instance of MockAppServerClient. Then, we define the getFriendResult as a success and also give it a payload of one friend. Next, we create an instance of FriendsTableViewViewModel. I’ve made one change to the ViewModel since the earlier post in the series. I defined initialiser that takes AppServerClient as parameter, so that the MockAppServerClient can be used. This technique is called dependency injection and it helps us to make classes testable. We don’t want to use the real one which is making network requests since unit tests do not make a network request. So we’ll replace it with a dummy implementation which we control the responses of the requests.
Next, we will call the getFriends() function. The one that get’s called in this case, is the one inside the MockAppServerClient. After that we check our ViewModels state, which should contain one normal cell inside friendCells. We can use guard to check that the first value inside the friendCells is actually a normal cell. If not XCTFail() is called, which marks the test as a failure. The syntax might look a bit odd if you see it the first time. We need to use “guard case”, since the friendCells.value contains enumeration FriendTableViewCellType. We also need to use .some since .first can return a nil, if the first value is not defined.
If we now try to run the test, we’ll see that the project is not compiling. The compiler is complaining: “Use of undeclared type FriendsTableViewViewModel”, so we need to add that to the unit test target, just as we did before for the Friend object. After we do that we’ll run into more trouble: “Use of undeclared type FriendCellViewModel” among other things.
Since our ViewModel has dependencies for FriendCellViewModel, SingleButtonAlert, Bindable and PKHUD, all those need to be added for the test target. Open all the files and select the box left on the FriendsTests under the target membership to include them. One last thing to do is to add Alamofire and PKHUD from pods to test target since we need the pods to be included in the tests. We can do this by opening the Podfile and add the lines for the test target.
|
1 2 3 4 5 6 7 8 9 10 11 12 13 |
source 'https://github.com/CocoaPods/Specs.git' platform :ios, '10.0' use_frameworks! target 'Friends' do pod 'Alamofire', '~> 4.0' pod 'PKHUD', '~> 4.0' end target 'FriendsTests' do pod 'Alamofire', '~> 4.0' pod 'PKHUD', '~> 4.0' end |
Now after we run “pod install” we are able to run the test and see it passing!
Unit test empty cells and failure cases
Now that the dependencies are sorted and we have the unit test ready and passing, let’s add the last two cases that the getFriend() call has:
|
1 2 3 4 5 6 7 8 9 10 11 12 13 14 15 16 17 18 19 20 21 22 23 24 25 |
func testEmptyFriendCells() { let appServerClient = MockAppServerClient() appServerClient.getFriendsResult = .success(payload: []) let viewModel = FriendsTableViewViewModel(appServerClient: appServerClient) viewModel.getFriends() guard case .some(.empty) = viewModel.friendCells.value.first else { XCTFail() return } } func testErrorFriendCells() { let appServerClient = MockAppServerClient() appServerClient.getFriendsResult = .failure(AppServerClient.GetFriendsFailureReason.notFound) let viewModel = FriendsTableViewViewModel(appServerClient: appServerClient) viewModel.getFriends() guard case .some(.error(_)) = viewModel.friendCells.value.first else { XCTFail() return } } |
After the first test, these are pretty straight forward. TestEmptyCells only difference, compared to the normal cell test, is that now the payload in the success result is set as an empty array and that in the guard statement, we are expecting the cell type to be empty. If this condition is met, the unit test will pass.
In the testErrorFriendCells, we are testing the failure case. We set the getFriendsResult as a failure and give notFound as the reason. Now, after the getFriends call, the test is expecting friendCells value to be the error cell. If that is the case, unit test is passing.
With these three tests, we have covered the cases for getting the friends from the server. Next, let’s unit test friend deleting!
Unit test Friend deleting
First, let’s override deleteFriend from AppServerClient and add deleteFriendResult:
|
1 2 3 4 5 6 7 8 9 10 11 12 |
private final class MockAppServerClient: AppServerClient { var getFriendsResult: AppServerClient.GetFriendsResult? var deleteFriendResult: AppServerClient.DeleteFriendResult? override func getFriends(completion: @escaping AppServerClient.GetFriendsCompletion) { completion(getFriendsResult!) } override func deleteFriend(id: Int, completion: @escaping AppServerClient.DeleteFriendCompletion) { completion(deleteFriendResult!) } } |
After the modifications MockAppServerClient should look like the code above.
Now, let’s add a unit test for success case and for failure case:
|
1 2 3 4 5 6 7 8 9 10 11 12 13 14 15 16 17 18 19 20 21 22 23 24 25 26 27 28 29 30 31 32 33 34 35 36 37 38 39 |
// MARK: - Delete friend func testDeleteFriendSuccess() { let appServerClient = MockAppServerClient() appServerClient.deleteFriendResult = .success appServerClient.getFriendsResult = .success(payload: [Friend.with()]) let viewModel = FriendsTableViewViewModel(appServerClient: appServerClient) viewModel.getFriends() guard case .some(.normal(_)) = viewModel.friendCells.value.first else { XCTFail() return } appServerClient.getFriendsResult = .success(payload: []) viewModel.deleteFriend(at: 0) guard case .some(.empty) = viewModel.friendCells.value.first else { XCTFail() return } } func testDeleteFriendFailure() { let appServerClient = MockAppServerClient() appServerClient.deleteFriendResult = .failure(AppServerClient.DeleteFriendFailureReason.notFound) let viewModel = FriendsTableViewViewModel(appServerClient: appServerClient) viewModel.friendCells.value = [Friend.with()].flatMap { .normal(cellViewModel: $0 as FriendCellViewModel)} let expectErrorShown = expectation(description: "Error note is shown") viewModel.onShowError = { _ in expectErrorShown.fulfill() } viewModel.deleteFriend(at: 0) waitForExpectations(timeout: 0.1, handler: nil) } |
First, we test the friend deletion success case. We create an instance of MockAppServerClient and give it both delete and getFriendsResult. We will first make sure that there is a friend in the ViewModel that can later be deleted, by calling the getFriends() method. After the first guard statement, we can be sure ViewModel has a normal cell containing Friends information. Since we also know that in the success block of the deleteFriend function, the FriendsTableViewViewModel updates the friends from the server, we can define a new return value, with an empty array as a payload. Now, after we call the delete function if the friendCells.value contains empty type, we know the delete function has done its job and the test passes.
The deleteFriendFailure is also an interesting one. It starts just like all the previous tests, by creating an instance of MockAppServerClient and since we are testing the failure case, deleteFriendResult is defined as a failure. Next, the viewModel is created and after that friendCells is given a value. But then there is something new compared to the previous tests. We define an expectation. XCTestExpectation is an async function, which can be used for waiting for a certain condition to be fulfilled. We know that the viewModel always calls onShowError if deletion fails, so we can use it to check that deletion is working. Inside expectErrorShown calls fulfill(), which marks the expectation done. In the last two lines, we call the actual delete function and define for how long the expectation will wait before failing the test. This case we can set it for 0.1 seconds.
Now when we compile and run the tests, we can see they are all passing!
Unit testing for ViewModel completed
And that’s it, now the whole ViewModel is tested. We don’t have 100-percentage coverage, but the core business logic is now tested using unit tests. If you open the Friend project from the GitHub, you’ll see there is also tests for most of the helper structs, and for the two missing viewModels we didn’t cover today. However, all those tests are very similar to the ones we covered in this post, so you should have no problems getting the hang of them. But as always, if you find anything unclear, or want to ask something, just comment on this post or send me an email.
I hope you had as much fun reading this post as I had writing it! Thank you and bye for now!
Nice post! Just dont need to add the class to the testing target, you can just use the @testable import.
Have a look here
https://www.natashatherobot.com/swift-2-xcode-7-unit-testing-access/
Hi Yishai,
I didn’t know you can use @testable import and skip adding the target. Thanks for the info!
Besides the part about testing normal cell and error cell, overall is still easy to follow.
guard case .some(.normal(_)) = viewModel.friendCells.value.first else {
XCTFail()
return
}
I roughly know this part is about checking and see if the cell is a normal cell type, but was having hard time to figure out the “guard case”, why .some (about Optional), pattern matching, and the wildcard pattern.
Actually now I still haven’t fully figure the mechanism of that whole line.
But nevertheless, the tutorial was very useful.
Hi HL,
Thanks, great to hear this tutorial helped you :).
I know the feeling.. The “guard case” and “if case” pattern wasn’t the easiest to adopt when I first encountered it. But basically we only want to know here that the first value in the friendCells is actually a .normal cell and we don’t care what the normal cell contains (that’s why we use the wildcard here). If the cell isn’t .normal type but for example an .error type we know something went wrong and we need to mark the test failed.
So we first check that the value is Option, hence we use the .some. After that we check that cell type to match .normal. If that is the case we know we can continue with the rest of the test code.
Not sure if I did a good job explaining it, but I hope you can figure it out with this. If not I’ll try do better job 🙂