Validate input data using Validator in Vapor 2.0
This time I will talk about how you can validate data with Vapor 2.0. I’ll go through the basics and also how you can use them inside the Model objects. It is important that the users of your service can’t insert invalid data to your system. So, you must always make sure the data provided is in correct format. In Vapor you can do that using the Validator. Validator is a Generic type that represents a piece of data that has been validated.
Validator defines the type of data you want the data to be validated against. For example, OnlyAlphaNumeric validator accepts only alphabetic and numeric input. There is also an email validator which makes sure the data provided is an email address. You can also define your own custom Validator by conforming to Validator protocol. In this post, I’ll show you how you can use them inside your model object, using the FriendService as an example. By the way, FriendService is a good example of not having the data validation correctly set up. It has been running for ~8months now, and without validation, the friend list now has some incorrect data in its variables. I would have been disappointed if it didn’t, so thanks for everyone who has tried it out.
FriendService is an example server-side Swift project. You can create, read, update and delete information about your trusted friends. Incase you want learn more about the service, please click the link above. You can find the source code for the project on GitHub. You can clone or donwload the project if you want, but you can also follow the example code in this blog post. Now, let’s get started!

Validate data
First, you need to add the validation package to your project. You can do that by using the swift package manager. Open the Package.swift file and add the validation package in it.
|
1 2 3 4 5 6 7 8 9 10 11 12 13 14 15 16 17 18 |
import PackageDescription let package = Package( name: "FriendService", dependencies: [ .Package(url: "https://github.com/vapor/vapor.git", majorVersion: 2), .Package(url: "https://github.com/vapor/mysql-provider.git", majorVersion: 2), .Package(url: "https://github.com/vapor/validation.git", majorVersion: 1) ], exclude: [ "Config", "Database", "Localization", "Public", "Resources", "Tests", ] ) |
You can spot the last package is called validation.git and that will add the Validator to your project. Next run vapor update on your terminal or command line so that vapor fetches the package.
Now that you have the tools setup I assume you are anxious to use them.
Basic validation
At first, let’s test the basic validation straight inside the main.swift file. Create a new onlyAlphaNumeric route which only allows alphabetic and numeric input:
|
1 2 3 4 5 6 7 8 9 10 |
import Validation droplet.post("onlyAlphaNumeric") { request in guard let input = request.data["param"]?.string else { throw Abort.badRequest } try OnlyAlphanumeric().validate(input) return input } |
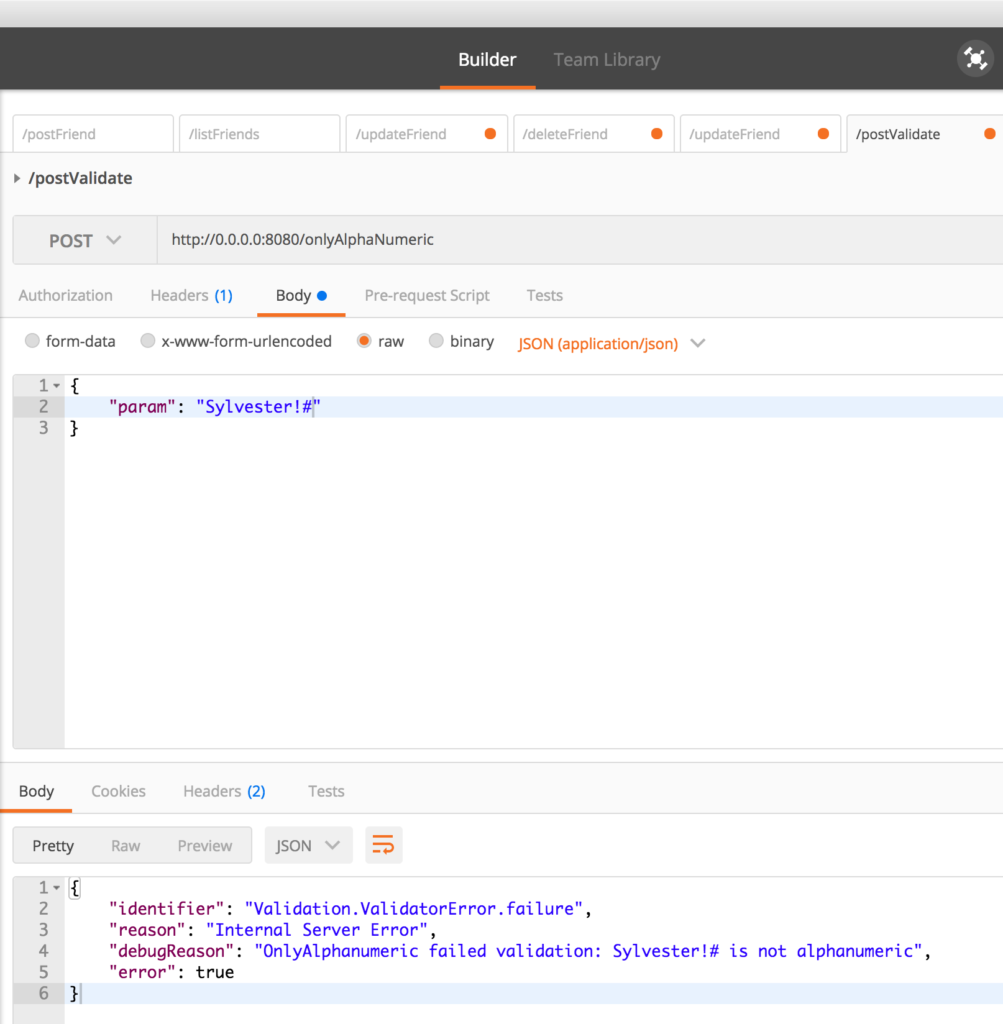
You need to check that param input is available and that it is a string. Otherwise, throw a badRequest error. Next line is the validation. Since the validate() can throw you need to add try in front of it. If the data provided passes the validation, return the provided parameter. Otherwise the route will throw with http-status code 500 “Internal server error”.
You can test this new route by running the application and posting data, for example with Postman. validate passes, if you post a string that only has alphabetic and numeric characters. If you past data that has some special characters validate will throw an error:
Let’s try another one. Say you have a restriction about the length of the data user can provide. For example, username must be atleast 2 characters long, but less than 41 characters. Here you can use the Count validator. Check the code below to see how to use it:
|
1 2 3 4 5 6 7 8 9 10 |
droplet.post("validateLength") { request in guard let input = request.data["param"]?.string else { throw Abort.badRequest } try input.validated(by: Count.min(2)) try input.validated(by: Count.max(40)) return input } |
Create a new route called validateLength, and check that the string provided is 2 or more characters long. Then check agains the maximum length of 40 characters. If the string passes both of these validations return the string back to the caller.
Validate data inside the Model
As you see, the code gets messy really fast if you do the validation inside the routes. That is why it is better to move the validation inside the model class.
|
1 2 3 4 5 6 |
/// Convenience init init(firstname: String, lastname: String, phonenumber: String) throws { self.firstname = firstname self.lastname = lastname self.phonenumber = phonenumber } |
Above, you can see the Friend model constructor. What you need to do is to validate all the data provided. First, import Validation to the file so that it is available in Friend model. Now, when you start validating the data, you can do it like this:
|
1 |
try OnlyAlphanumeric().validate(firstname) |
Now the firstname provided can only include alphabetics and numerics. If the validation fails, friend is not created and validate throws an error.
But wait a minute! OnlyAlphaNumeric is not the correct validation here. You are absolutely right! Next let’s check how you can create custom Validators.
Validate data with custom data Validator
You can create your custom data validator by confirming the Validator protocol:
|
1 2 3 4 5 6 7 8 |
/// An object that can be used to validate other objects public protocol Validator { /// The supported input type for this validator associatedtype Input: Validatable /// The validation function, throw on failed validation with `throw error("reason")` func validate(_ input: Input) throws } |
I won’t go to protocols with associated type (PAT) since it is not in the scope of this post. If you want to understand it better, checkout this Alexis Gallagers talk about the topic. The thing that is interesting here is the validate function which you need to implement. Check the implementation of OnlyAlphaNumeric validator:
|
1 2 3 4 5 6 7 8 9 10 11 12 13 14 15 16 17 18 19 20 21 22 23 24 25 26 |
private let alphanumeric = "abcdefghijklmnopqrstuvwxyz0123456789" private let validCharacters = alphanumeric.characters /// A validator that can be used to check that a /// given string contains only alphanumeric characters public struct OnlyAlphanumeric: Validator { public init() {} /** Validate whether or not an input string contains only alphanumeric characters. a...z0...9 - parameter value: input value to validate - throws: an error if validation fails */ public func validate(_ input: String) throws { let passed = input .lowercased() .characters .filter(validCharacters.contains) .count if passed != input.characters.count { throw error("\(input) is not alphanumeric") } } } |
As you can see, first the valid character set is defined at the start of the file. Then inside the OnlyAlphaNumeric struct validate function is defined to conform the Validator protocol. By using this file as an example, it is very easy for you to start creating your own custom validators.
Since I live in Scandinavia, I created a validator that accepts scandinavian names. Checkout how the OnlyScandicAlpha validator looks like:
|
1 2 3 4 5 6 7 8 9 10 11 12 13 14 15 16 17 18 19 20 21 22 23 24 25 26 27 28 |
import Validation private let scandicAlphaCharacters = "abcdefghijklmnopqrstuvwxyzåäö" private let validCharacters = scandicAlphaCharacters.characters /// A validator that can be used to check that a /// given string contains only alphanumeric characters public struct OnlyScandicAlpha: Validator { public init() {} /** Validate whether or not an input string contains only alphanumeric characters. a...zåäö - parameter value: input value to validate - throws: an error if validation fails */ public func validate(_ input: String) throws { let passed = input .lowercased() .characters .filter(validCharacters.contains) .count if passed != input.characters.count { throw error("\(input) does not contain only alpha characters") } } } |
Validate name and phone number
Now, everything is ready. You can add validation for name and phone number inside the Friend model. Add the following 3 lines to the constructor:
|
1 2 3 4 5 6 7 8 9 10 11 |
/// Convenience init init(firstname: String, lastname: String, phonenumber: String) throws { // validate try OnlyScandicAlpha().validate(firstname) try OnlyScandicAlpha().validate(lastname) try PhonenumberValidator().validate(phonenumber) self.firstname = firstname self.lastname = lastname self.phonenumber = phonenumber } |
Validate length between certain range
|
1 2 3 |
let nameLengthValidator = Count<String>.containedIn(low: 2, high: 40) try nameLengthValidator.validate(firstname) try nameLengthValidator.validate(lastname) |
Create an instance of Count and name it nameLengthValidator. Count is defined with a Generic type Countable. Because of that, you need to specifically define the input type you are passing is String. Vapor has already conformed String to Countable so you can use it here. Next, use the containedIn function to set the low and high values. These are the minimum and maximum character lengths the string is validated against. If the string does not pass these conditions, an error is thrown. After this you can be sure the data provided is the way you want it to be.