
How to use Swift playgrounds to help with UI development
Today I want to talk to you about Swift playgrounds! In the last post I showed you how you can run your entire application inside swift playgrounds. It really was fun to get it running, but I am not sure if it helps that much with the development work. I really wanted to see if playground can help with UI development.
So in this blog post I’ll show you how to load specific view from storyboard in playground, replace the network layer with static data and quickly test the view in different resolutions and orientations. To achieve this I’ll use the techniques from previous post to load the view in playground, and protocols and dependency injection to provide whatever data I want to test with to the view.
To cover all this I created an example application PlaygroundCollectionViewCells. The application shows dynamic size collection view cells which represents albums. Those albums can be two different sizes: cd and lp. The cells also have dynamic height since the text length differs between the albums. The project does not make real network requests, but it has a dummy network layer to simulate how the data would be fetched.
The project is on GitHub so you can get it from there. But you can just follow this post since I cover the most important parts here.
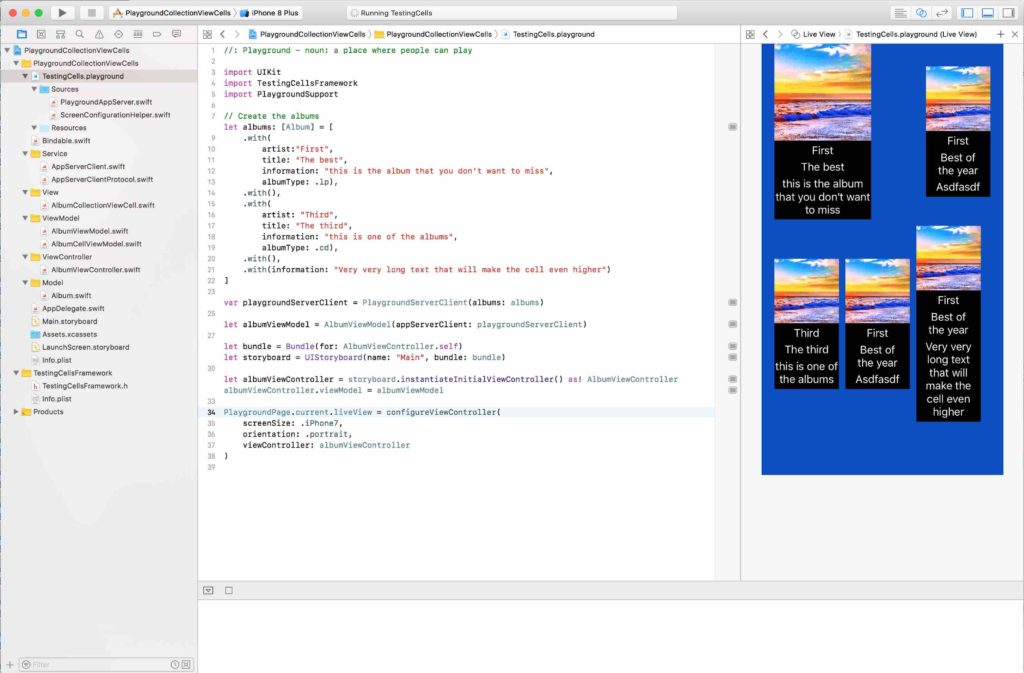
Project running in swift playgrounds
Quick review of the project
PlaygroundCollectionViewCells is built using MVVM pattern. This means that it has ViewModel object between the Model and the View, which prepares the data for the view. In case you want to learn everything you need to know about the MVVM pattern, checkout my tutorial MVVM pattern with Swift application.
The core functionality is in these objects:
- Album (Model)
- AlbumViewModel
- AlbumViewController
- AppServerClient (Dummy network layer)
On top of those you can also find AlbumCellViewModel and AlbumCollectionViewCell which handles the cells inside the AlbumViewControllers collection view.
Album
Album is just the model that has all the information that album has:
|
1 2 3 4 5 6 7 8 9 10 11 12 |
public enum AlbumType { case cd case lp } public struct Album { let artist: String let title: String let information: String let imageUrlString: String let albumType: AlbumType } |
Album type tells whether album is a cd or lp which eventually affects the cell size.
Album also has a helper extension which helps this example app to provide content to the screen:
|
1 2 3 4 5 6 7 8 9 10 11 12 13 14 15 16 |
// MARK: - extension Album. // Helper function to create data for this example. public extension Album { public static func with(artist: String = "First", title: String = "Best of the year", information: String = "Asdfasdf", imageUrlString: String = "22222", albumType: AlbumType = .cd) -> Album { return Album(artist: artist, title: title, information: information, imageUrlString: imageUrlString, albumType: albumType) } } |
With the extension you can create data by calling Album.with() which creates a single album with the default values provided in the function.
AlbumViewModel
AlbumViewModel is a struct that prepares the data for the view controller.
|
1 2 3 4 5 6 7 8 9 10 11 12 13 14 15 16 17 18 19 20 |
public struct AlbumViewModel { let cells = Bindable([AlbumCellViewModel]()) let appServerClient: AppServerClientProtocol public init(appServerClient: AppServerClientProtocol) { self.appServerClient = appServerClient } public func getAlbums() { appServerClient.getAlbums { switch $0 { case .success(let albums): self.cells.value = albums.flatMap { $0 as AlbumCellViewModel } case .failure: // no operation in this example project break } } } } |
It stores the AlbumCellViewModels inside cells array. These are used to create the UITableViewCells for the UICollectionView in the view controller. It also has an instance of AppServerClient which can be injected to the struct. On top of that the module also has getAlbums() function which is used to get the album content.
Bindable is used here to bind the cell values to the view. Whenever the value changes, view is notified and it reloads the cells. Bindable is also covered in more detail in the MVVM blog post series in this same site.
AppServerClient
AppServerClient handles all the network requests. It actually does not make any real request since I don’t have a backend running that would provide this kind of data.
|
1 2 3 4 5 6 7 8 9 10 11 12 13 14 |
/// AppServerClient is a stub for networking struct AppServerClient: AppServerClientProtocol { func getAlbums(_ completion: @escaping (Result<[Album]>) -> Void) { // Returns static data to show something on the screen let albums: [Album] = [ .with(information: "this is the album"), .with(albumType: .lp), .with() ] completion(.success(albums)) } } |
It uses the Album.with() function to create album data and the return it in the success block. AppServerClient conforms to AppServerClientProtocol which is a protocol that defines the networking interface.
|
1 2 3 |
public protocol AppServerClientProtocol { func getAlbums(_ completion: @escaping (Result<[Album]>) -> Void) } |
We want to use the protocol so that another object can be used to replace the actual implementation in the view model in unit testing. Or as in this case when we use swift playgrounds to test the UI. Another benefit here is that we don’t have to include AppServerClient.swift file to the frameworks target when running the project in playground.
AlbumViewController
AlbumViewController is where most of the magic happens. It starts to listen the changes in the view model using Bindable and creates the cells for the UICollectionView according to data provided.
|
1 2 3 4 5 6 7 8 9 10 11 12 13 14 15 16 17 18 19 20 21 22 23 24 25 26 27 28 29 30 31 32 33 34 35 36 37 38 39 40 |
public class AlbumViewController: UIViewController { @IBOutlet private var collectionView: UICollectionView! { didSet { collectionView.delegate = self collectionView.dataSource = self (collectionView.collectionViewLayout as? UICollectionViewFlowLayout)?.estimatedItemSize = UICollectionViewFlowLayoutAutomaticSize } } public var viewModel: AlbumViewModel? { didSet { bindViewModel() } } public override func viewDidLoad() { super.viewDidLoad() viewModel?.getAlbums() } private func bindViewModel() { viewModel?.cells.bindAndFire { [weak self] _ in self?.collectionView?.reloadData() } } } extension AlbumViewController: UICollectionViewDataSource, UICollectionViewDelegate { public func collectionView(_ collectionView: UICollectionView, numberOfItemsInSection section: Int) -> Int { return viewModel?.cells.value.count ?? 0 } public func collectionView(_ collectionView: UICollectionView, cellForItemAt indexPath: IndexPath) -> UICollectionViewCell { let cellViewModel = viewModel?.cells.value[indexPath.row] let identifier = (cellViewModel?.cellSize == .big) ? "bigAlbumCell" : "smallAlbumCell" let cell = collectionView.dequeueReusableCell(withReuseIdentifier: identifier, for: indexPath) as? AlbumCollectionViewCell cell?.viewModel = cellViewModel return cell ?? UICollectionViewCell() } } |
Notice that all the functions from the view controller interface are mark as public. As I explained in the previous post, how to run your application in swift playground, you need to define all the functions that are used through the framework to public. In a nutshell view controller starts to load the album data in viewDidLoad and when it receives info in the bindViewModel() viewModel?.cells.bindAndFire function it tells the collection view to reload it’s data. After that the cells are created and presented on the screen. The project has 2 different cell sizes defined in the storyboard so depending on the cellSize attribute, different identifier is used to select the correct cell for the correct album type.
I won’t go through the AlbumCollectionViewCell and AlbumCellViewModel implementations since those are pretty straight forward. Please ask me if there is something that is unclear when you browse through the code.
So this is the core functionality and when you run the project in the simulator it looks like this.

Application running on iPhone8 simulator
Now that the basic functionality is covered, let’s dive in to the good stuff!
AlbumViewController in swift playgrounds
To get any part of your application to run in the playground you need to create a framework. That framework needs to have all necessary files included to it’s target. Also you need to create a playground file and add it to the project. As already mentioned the interfaces that are used via the created framework needs to be public. You can check the necessary steps in more details in my previous post: How to run your application in Swift playground. Today I assume we have the playground, framework and all the files added to the correct target.
Replace network layer with mock implementation
We don’t want to use any real data fetched over network, so we need a way to replace it when using swift playgrounds. We need to create a new module that conforms to the AppServerClientProtocol. When we include the swift playgrounds file to the project also Sources and Resources folders appears under it. Now we need to create a new file named PlaygroundAppServer and make it to conform to the AppServerClientProtocol.
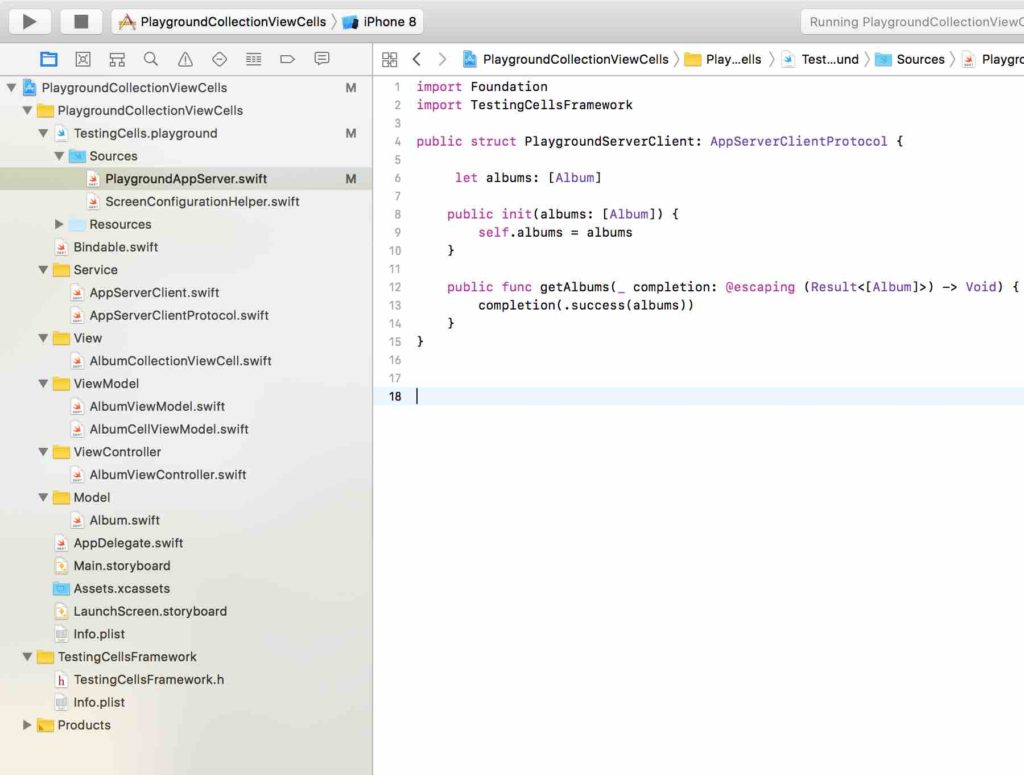
PlaygroundAppServer implementation
PlaygroundAppServer has one variable named albums. We can provide this data when creating an instance of the object and control what kind of cells will be created. Also notice that the TestingCellsFramework is included in the import statement. Otherwise the file wouldn’t know about the AppServerClientProtocol.
Now let’s look at the playground file.
Create AlbumsViewController in the playground and present the wanted data
Again at the top of the file let’s import TestingCellsFramework. After that we’ll create the albums that we want to present on the screen. Then when creating the playgroundAppServerClient we give the albums as parameter. Next, we’ll use some dependency injection magic and replace the actual implementation in the AlbumsViewModel with the mock version we just created.
|
1 2 3 4 5 6 7 8 9 10 11 12 13 14 15 16 17 18 19 20 21 22 23 24 |
import UIKit import TestingCellsFramework import PlaygroundSupport // Create the albums let albums: [Album] = [ .with( artist:"First", title: "The best", information: "this is the album that you don't want to miss", albumType: .lp), .with(), .with( artist: "Third", title: "The third", information: "this is one of the albums", albumType: .cd), .with(), .with(information: "Very very long text that will make the cell even higher") ] var playgroundServerClient = PlaygroundServerClient(albums: albums) let albumViewModel = AlbumViewModel(appServerClient: playgroundServerClient) |
Now, all we need to do is to create the AlbumViewController from storyboard. This can be done by first creating a bundle, creating the storyboard and then loading the view controller. After that we set the AblumViewModel as it’s view model and then we set the view controller as the liveView for the playground.
|
1 2 3 4 5 6 7 |
let bundle = Bundle(for: AlbumViewController.self) let storyboard = UIStoryboard(name: "Main", bundle: bundle) let albumViewController = storyboard.instantiateInitialViewController() as! AlbumViewController albumViewController.viewModel = albumViewModel PlaygroundPage.current.liveView = albumViewController |
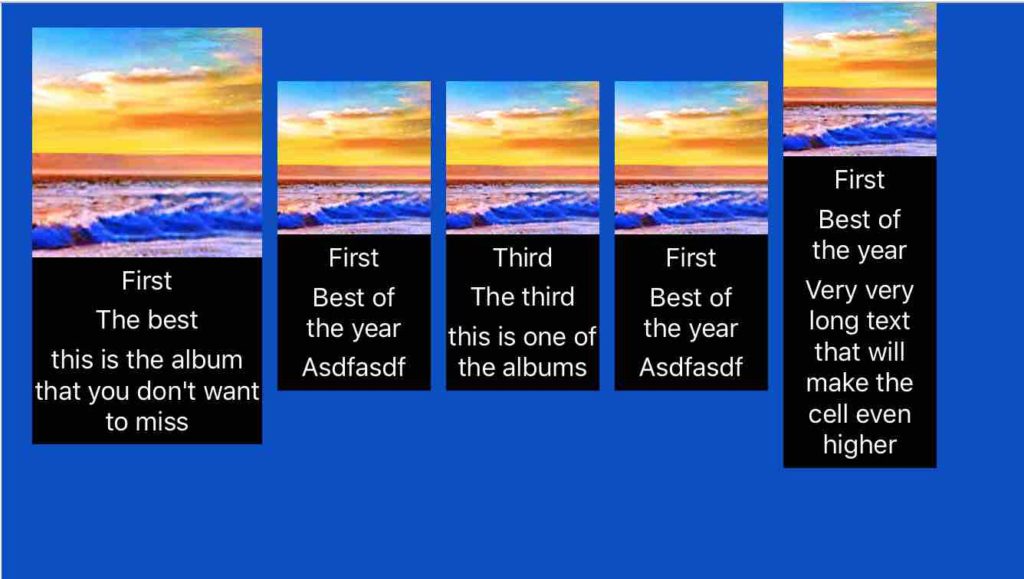
When we run the playgound the result looks like this.
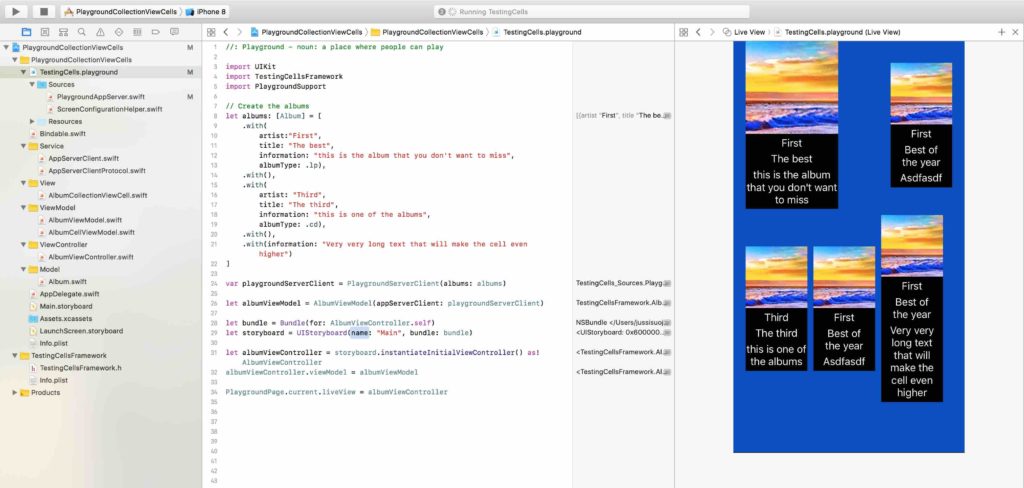
The great thing about this is that we can check how the cells look with different data by just adding more text to the dummy cells inside the album array. The change takes maybe 2 seconds to load and the result is visible.
I’ll show you one last thing before we wrap up. Let’s check how we can test the different resolutions and portrait vs landscape modes!
Test for different device sizes and orientation
This idea I got from the kick starter app. I watched one of their swift talk episodes where they talked about playground driven development. They used a helper class to provide different screen sizes, orientations, size classes and trait collection. I encourage you to check the episode to learn more about playground and how to build UI in the code. I made this helper class a bit simpler and you can only change screen size and orientation.
So first let’s create a new file in the playground source folder. I named the file ScreenConfigurationHelper. In the file you can see the enumerations for orientation and different iPhone screens.
|
1 2 3 4 5 6 7 8 9 10 11 12 13 14 15 16 17 |
public enum Orientation { case portrait case landscape } public enum ScreenSize { case iPhone4 case iPhone5 case iPhone5s case iPhone6s case iPhone6sPlus case iPhone7 case iPhone7Plus case iPhone8 case iPhone8Plus case iPhoneX } |
There is also one function which takes screen size, orientation and view controller as parameter. Inside that function we set view controllers view and size according to the provided parameters.
|
1 2 3 4 5 6 7 8 9 10 11 12 13 14 15 16 17 18 19 20 21 22 23 24 25 26 27 28 29 30 31 32 33 34 35 36 37 |
public func configureViewController(screenSize: ScreenSize = .iPhoneX, orientation: Orientation = .portrait, viewController: UIViewController) -> UIViewController { switch screenSize { case .iPhone4: viewController.view.frame = CGRect(x: 0, y: 0, width: (orientation == .portrait) ? 320 : 480, height: (orientation == .portrait) ? 480 : 320) case .iPhone5, .iPhone5s: viewController.view.frame = CGRect(x: 0, y: 0, width: (orientation == .portrait) ? 320 : 568, height: (orientation == .portrait) ? 568 : 320) case .iPhone6s, .iPhone7, .iPhone8: viewController.view.frame = CGRect(x: 0, y: 0, width: (orientation == .portrait) ? 375 : 667, height:(orientation == .portrait) ? 667 : 375) case .iPhone6sPlus, .iPhone7Plus, .iPhone8Plus: viewController.view.frame = CGRect(x: 0, y: 0, width: (orientation == .portrait) ? 414 : 736, height: (orientation == .portrait) ? 736 : 414) case .iPhoneX: viewController.view.frame = CGRect(x: 0, y: 0, width: (orientation == .portrait) ? 375 : 812, height: (orientation == .portrait) ? 812 : 375) } viewController.view.autoresizingMask = [.flexibleWidth, .flexibleHeight] viewController.preferredContentSize = viewController.view.frame.size return viewController } |
Now all we need to do is to give the view controller as parameter with wanted configurations to see how the view behaves with that setup. For example, to see iPhone8 in landscape mode replace the last line in playground file with this line of code:
|
1 2 3 4 5 |
PlaygroundPage.current.liveView = configureViewController( screenSize: .iPhone8, orientation: .landscape, viewController: albumViewController ) |
And the result looks like below.
iPhone8 in landscape mode
Conclusion
Testing the UI in playground can be a helpful technique. Setting up the playground, framework and making the interfaces public can take a bit time the first time you are doing it, but after that it becomes pretty easy. You also have to design your code so that parts of it can be replaced with components that you create in the swift playgrounds side (for example PlaygroundServerClient). Usually that is something that you would do anyway, because you also want to unit test your application.
The biggest problem I had when setting things up was that swift playgrounds are pretty unstable. Every time I open the project it first complains about:
|
1 2 3 4 |
Playground execution failed: error: TestingCells.playground:4:8: error: no such module 'TestingCellsFramework' import TestingCellsFramework |
The only way to get the playground compiling again, that I found, is to comment every line of code from the TestingCells.playground and PlaygroundServerClient. When you uncomment the code and save the files, the playground magically finds the TestingCellFrameWork again. On top of that sometimes the assistant editor just doesn’t show anything. Assistant editor is the place you’ll see the live view of the playground. In this case you need do reset the assistant editor by selecting View -> Assistant Editor -> Reset Editor. Another thing to keep in mind is that, you need to first compile the project, then the framework and only then you can test the code run the playground.
I’ll definitely continue testing how to use playgrounds to help with UI development. It would be great to also make it support localisations, so that you could easily check how different texts fit to your UI. I would really like to hear how you have used swift playgrounds in development? Any tips that you can share with me? Anyway this post is getting a bit longer than I intended so it’s time for me to thank you for reading, and I also want to wish you a great day my friend!