How to run your application in Swift playground
I’ve been playing around with Swift playground lately and today I want to share with you, how you can run your complete project inside a Swift playground. I got the idea when I was constructing cells with dynamic height for UICollectionView. After a while I was a little bit frustrated to always test the changes on simulator. I wanted to see the changes right away with any kind of data. So I started experimenting. I always design my UI using storyboard or xib so my goal was to open the view controller inside Swift playground and see the changes. So the first goal was to show any view controller inside Swift playground. I was a bit surprised that the end result was that I had my complete project running on playground, with networking and everything. In this article I’ll go through the steps how to do this.
If you are interested in testing a single view in playground with all resolutions and orientations, you should also check my post How to use Swift playgrounds to help with UI development.
How to run your project in Swift playground
In this article I am once again using the good old Friends project. The project is basically a CRUD implemented using MVVM architecture and it communicates with a backend implemented with Vapor using Swift. Checkout the blog post MVVM pattern with Swift for more information.
The steps to run your project inside Swift playground is:
- Create a playground file and add it to your project.
- Create a new framework to your project & add all the needed files to that frameworks target.
- Install pods to the new framework.
- Load and present the wanted view in the playground.
Create Swift playground file and add it to your project
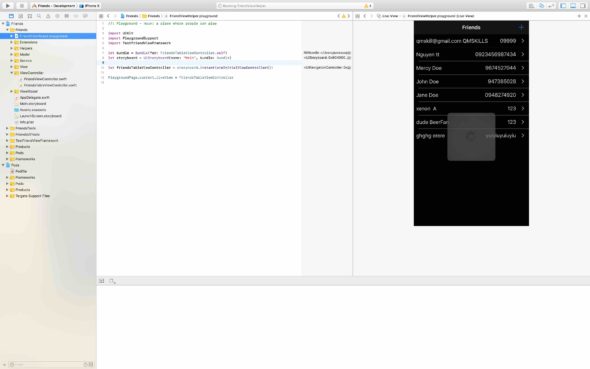
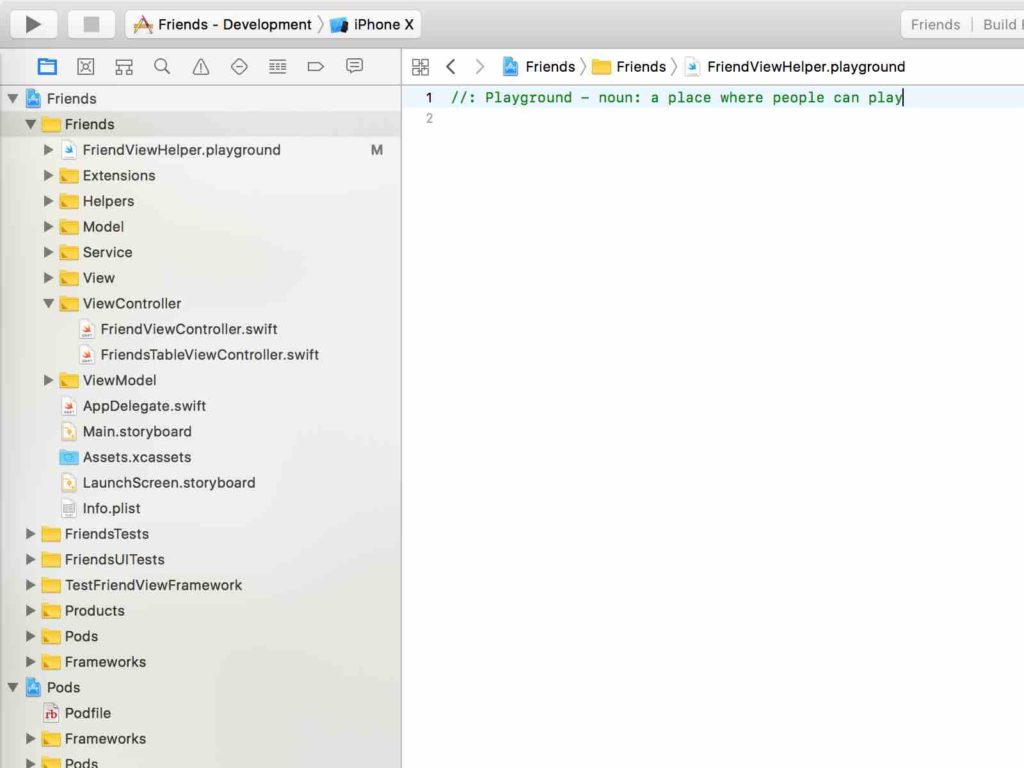
So I have the Friend project open in Xcode, you can follow these instruction and do the steps for your own project. First lets select “File -> New -> Playground”. Next, select the blank playground and give it a name, for example FriendViewHelper. Make sure you place the playground inside the project folder and press create. Now we have the playground created but it is not yet visible in the project hierarchy in Xcode. Just left click anywhere in the project structure and select “Add files to project” and select the playground file. End result should look like below.
Create a new framework for your project
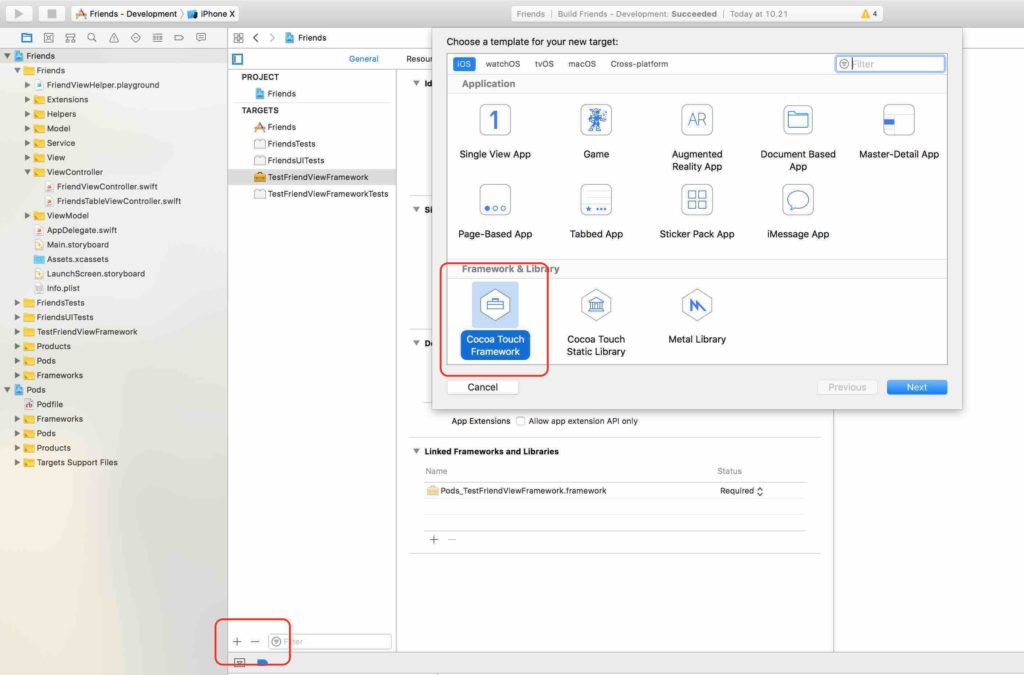
The framework works as a framework to load the components from your project. Now that’s a nice looking sentence :). To create a new framework we need to open the project file and select the small plus button at the bottom of the image right below the TARGETS. Then we need to scroll down the list and select the Cocoa Touch Framework. After we have given it a name, it will appear in the TARGETS list. I named mine to TestFriendViewFramework
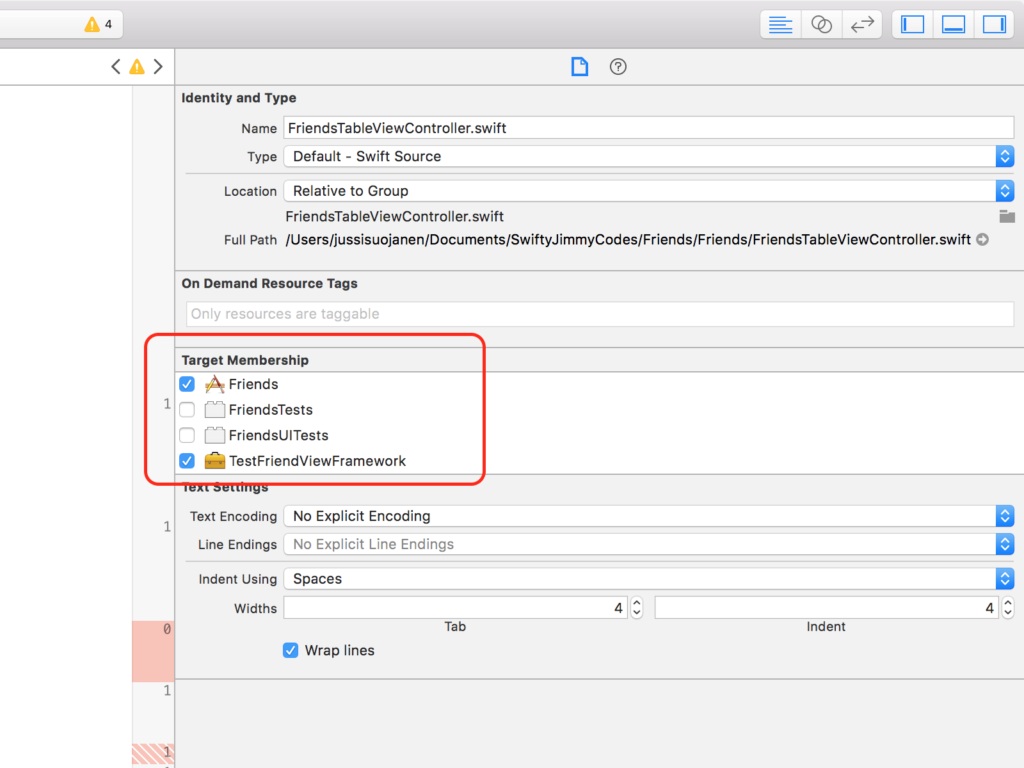
Since we are running the whole project in the Swift playground. We need to add all the wanted files the new TestFriendViewFramework target. Including the storyboard and xib-files we might have. This is accomplished by selecting a file, and then selecting the checkbox on the right side of Xcode in front of the TestFriendViewFrameWork. See the image below.
That is actually all we need to do for the framework (except for the cocoa pods library). Just remember to compile the framework every time you make changes to the files. If you forget to do this, the changes won’t be available through the framework. Now if you compile the project you’ll notice that it complains about the missing pods. In Friends project the first issue is PKHUD and the next one Alamofire. Let’s fix them!
Add pods to the new framework
To add Alamofire & PKHUD libraries to the new target we need to add these lines to the Podfile:
|
1 2 3 4 |
target 'TestFriendViewFramework' do pod 'Alamofire', '~> 4.0' pod 'PKHUD', '~> 5.0' end |
The target is the previously created TestFriendViewFramework and the lines inside the target block are just copied from the normal pod install definitions. Now all we need to do is to run “pod install” in the command line. After closing and opening the project again, we can start modifying the Swift playground file.
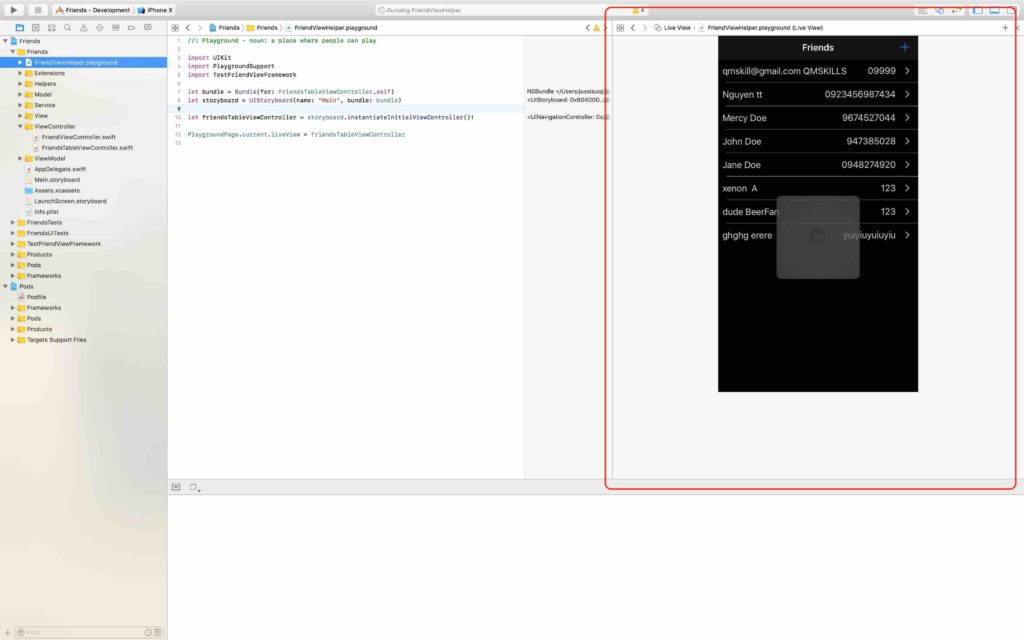
Load and present the wanted view in Swift playground
Let’s open the FriendViewHelper playground file which should still be empty at this point. First thing to do is to import the TestFriendViewFramework. We also have to import UIKit and PlaygroundSupport so we add the following 3 lines at the top of the playground.
|
1 2 3 |
import UIKit import PlaygroundSupport import TestFriendViewFramework |
Next let’s create a bundle with FriendsTableViewController type which is the view controller that we want to load from the storyboard.
|
1 |
let bundle = Bundle(for: FriendsTableViewController.self) |
After adding this line you should see an error when playground tries to run the code:
|
1 2 3 4 |
Playground execution failed: error: FriendViewHelper.playground:5:26: error: use of unresolved identifier 'FriendsTableViewController' let bundle = Bundle(for: FriendsTableViewController.self) |
This happens because we have not defined the class FriendsTableViewController as public. Since we are using it through a framework, FriendsTableViewController has to be marked as public. Also the functions that we are overriding from UITableViewDelegate and UIViewController interfaces needs to be public. So in Friends project case, we have to set the following functions in FriendsTableViewController public.
|
1 2 3 4 5 6 |
public override func viewDidLoad() public override func prepare(for segue: UIStoryboardSegue, sender: Any?) public override func tableView(_ tableView: UITableView, numberOfRowsInSection section: Int) -> Int public override func tableView(_ tableView: UITableView, cellForRowAt indexPath: IndexPath) -> UITableViewCell public override func tableView(_ tableView: UITableView, canEditRowAt indexPath: IndexPath) -> Bool public override func tableView(_ tableView: UITableView, commit editingStyle: UITableViewCellEditingStyle, forRowAt indexPath: IndexPath) |
After we added the public keywords and compiled the framework, the playground file does not complain about the unresolved identifiers anymore. Btw, sometimes when working with playgrounds the code changes does not seem to take effect even if you save the file. I’ve noticed that commenting and uncommenting a line of code is sometimes the key to get rid of an error. This happened again when I was writing this post.
Now, all we have left is to create the storyboard, load the initial view controller and set it as the liveView for the playground.
|
1 2 3 4 5 |
let storyboard = UIStoryboard(name: "Main", bundle: bundle) let friendsTableViewController = storyboard.instantiateInitialViewController()! PlaygroundPage.current.liveView = friendsTableViewController |
First, construct the storyboard and give the previously created bundle as a parameter. Next, since FriendsTableViewController UI is defined in the Main storyboard and it is the initial view controller, we can instantiate it with instantiateInitiaViewController(). It returns an optional but let’s force unwrap it here. We will not use the code in production so the force unwrapping is ok.
Swift playground has a defined liveview which we can use to set the view controller visible. In the last line we set the friendsTableViewController as the current live view for the playground. Incase you are not seeing the view controller, just press “Alt + Cmd + Enter” or select “View -> Assistant Editor -> Show assistant editor” and you will see your project running.
Conclusion
The process it self was very easy. Create a playground -> create a framework -> add your files to the framework -> install pods to the target -> make the UIViewController interface public -> load the view to playground live view. As said I was a bit surprised to see the whole project running inside a Swift playground. The goal was only to load specific view and then see the possible changes done to UI immediately, without running the code in simulator. I was pretty excited to see that Swift playground can also use networking and that the whole project can run it. So excited that I wanted to write a blog post about it. Looking back it seems so obvious, but I just hadn’t thought of it before seeing it in action :).
Next time I’ll continue with Swift playground theme. We will see if and how playground can help to construct your views inside storyboard view controller. Goal is still the same to apply Swift playground with UICollectionView and see how different kind of cells behave with dynamic content, in all resolutions and orientations. You can read the post here.
Thanks for reading and have a great day my friend!
I’m having a problem getting this to work. I followed this tutorial earlier in one of my own projects and it worked for me, I was able to see my own ViewController in playground as a live view. I then made changes to the VC which didn’t update. I then started getting error messages next to import saying ‘No such module as ” after it worked.
I’ve tried starting a fresh project and following these steps but all I’m getting is that there is no such Module even though I have created the framework and linked the files I want to it.
I desperately want this to work as I think it would save me so much time not having to compile and app and run it on phone every single time. Also making UI changes will be much quicker if updating live.
What might be causing the framework to not be recognised?
Hi Robert,
I actually had the same kind of problems. I mentioned them in the second playground posts conclusions part. The only way that I found to get around this problem, is to comment all the code inside your .playground -file and some times also some helper files that I defined for the playground, for example the mocked network client. After that I compiled the project again, then the framework and then uncommented the code. Usually this approach worked but it’s not 100% sure.
I really hope this helps you! I know it’s not the most pleasant thing to do, so if you find a better way to fix the problem, please let me know 🙂
I’ve downloaded the demo projects for this page and the next. I think my confusion is what you mean by compiling the project and framework separately. I also thought pages auto saved so I’m a bit lost there too.
Its frustrating as I made a project where the storyboard showed me one of my own pages but then none of the changes. And then nothing ever again! I spent 4 hours last night trying to get it to work again. All the tutorials for using playgrounds set up a programatic view controller which is frustrating as I want to be able to tests ones I’ve made in storyboard quicker rather than having to always compile and view on actual device
4 hours… I can feel your frustration =/. By compiling the framework and project separately I mean that you have to click to select “YourFramework” from the left side of xcode project files and then press cmd + b. That builds the framework and only after that the changes that you have made to your project will be available to use in your playground via the framework.
I guess the autosave depends on your Xcode setting. I am so used to press cmd + s that I am not sure if it uses autosaving or not 🙂